iconpractice can collect card payments from patients at the time they make an online booking. This uses the same Stripe account you have connected under Settings > Integrations > Stripe — no separate Stripe setup is required.
Note: Pre-Payment is only available using the online booking widget. It is not available through the hosted online booking page.
Activating Pre-payment for a Service
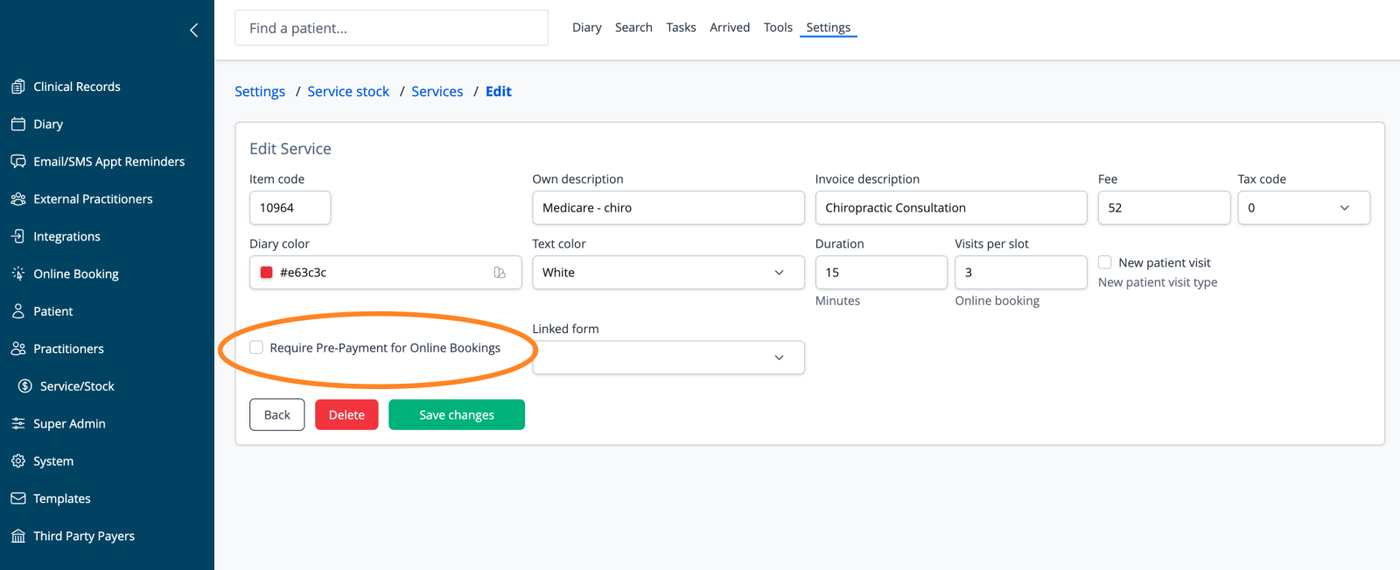
For Individual Appointment types head to:
Settings->Service/Stock->Services->Edit
Or for Group Appointment (Class) types head to:
Settings->Service/Stock->Group appointment types->Edit
On the respective page for the service item, tick the "Require Pre-Payment for Online Bookings", then “Save changes”. The service or group appointment will now require pre-payment.
Payment Stripe Details
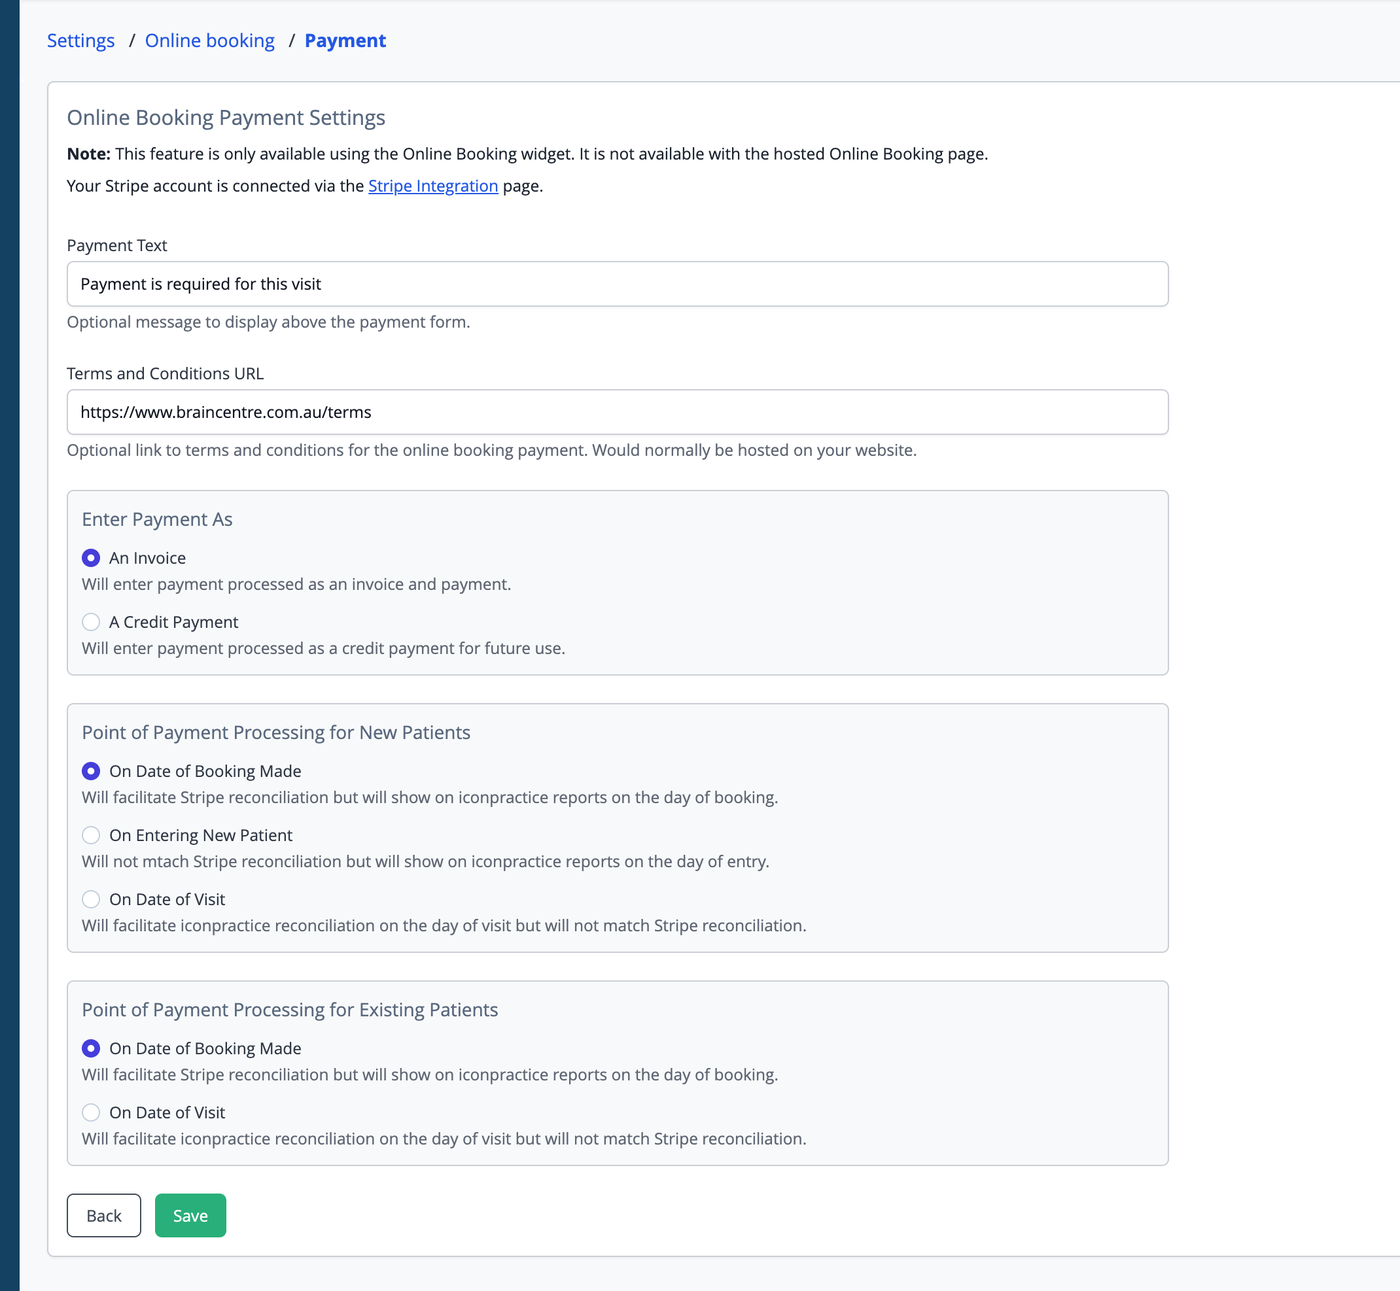
To link the online booking with your Stripe Account, head to Settings->Online Booking->Online Booking Payment Settings.
Configure:
Payment Text: This is the text shown to patients as they are booking. E.g. "Pre-payment is required for this appointment". This text is optional.
Terms and Conditions URL: This is a link to a website page detailing any terms and conditions you apply to the pre-payment. This might include refund policies etc. This link is recommended but optional.
Payment Entering Options: See below.
You may wish to process some test transactions. If so, set your Stripe account to Test mode via the Stripe Dashboard and use a Stripe test card for a transaction.
Once an appointment is made with a pre-payment, the appointment will be marked as paid in the diary, i.e. the text of the appointment will be crossed or struck out. For reconciliation purposes, be aware that the transaction will be entered on the day of the booking, not the day of the appointment. However, for new patients, the transaction will only be finalised when they are entered into the system. See below for more details.
If a new patient books with pre-payment, cancelling the appointment will cause the payment to be "lost". See below for more details on this.
Taking deposits
Prepayments are "all or nothing". Should you wish to take a partial payment, we recommend creating a service type for the partial payment amount, and a second type for the remainder of the fee. Thus when the person books the appointment online they will be billed for the deposit, and then the remainder can be processed at the time of the visit.
Prepayments for New Patients
As you will be aware, at the time of booking, new patients are entered into the diary as an appointment only. To be fully in the system as a patient you must click the appointment then click the "Enter Details" button, complete the details then save.
Any prepayments taken for new patients are "attached" to the appointment until such time that the new patient is fully entered into the system. As such, deleting/cancelling the appointment prior to entering the new patient will result in the payment being lost. Therefore, if it is necessary to delete the appointment, be sure to fully enter the patient into the system prior to deleting. This will ensure the payment is visible in your records.
Payment Processing Options
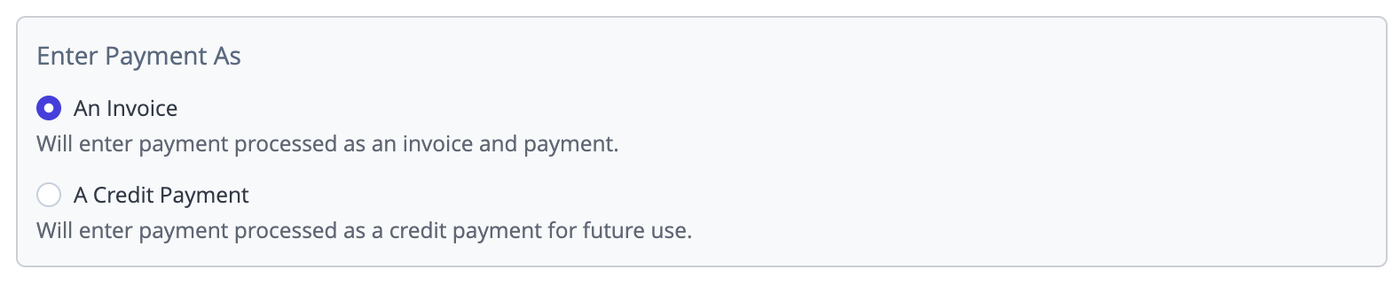
“Enter Payment As”
You may choose to have the system process the payment as an invoice with an accompanying payment, or as a credit payment which can be applied to an invoice later.
Payment processing date
You can choose a setting for the date at which the pre-payment will be recorded. For New Patients you can choose:
On the date the booking is made,
On the date the patient new patient is entered in the system, or
On the date of the booked appointment.
For Existing Patients you can choose either:
On the date the booking is made, or
On the date of the booked appointment.

For existing patient bookings that can be successfully linked to an existing patient at the time of booking, the payment will be processed onto their account immediately and will be visible on the Daily Invoices and Payments report for the processing date you have chosen. For example, if you have chosen on the date of the appointment visit, it will be visible on the report for that date. If is is the date of booking, it will be the date the patient made the appointment online. For existing patient appointments that need to be validated to link them to a patient, the pre-payment will be processed at that moment and entered with a date for the processing date you have chosen.
Note it may be necessary to extend the time parameters on the Daily Invoices and Payments report to view payments taken outside of office hours. The payment type under which the payment will be recorded will depend on the card used during the booking. If a Visa card was used to make prepayment, then this will show under the Visa total on the report. Be aware that this may cause the system to have a discrepancy with totals obtained from your credit card terminal.
For new patients, as discussed above, the payment is “held” until the new patient is fully entered into the system. On entering the new patient, the system will then enter a transaction under the patient's account, dated according to your preferences. Thus, unless the new patient is entered on the day of receiving the booking, new patient booking payments will not show on that day's financial reports. However, they will show for the booking day after the patient is entered. Be aware that this may cause apparent differences in the totals if a day's financial report is run at a later date.
Lastly, if you have chosen a date other than the date of the appointment, be aware that if patients are using receipts to claim with their health insurance from a pre-paid online booking, the date of service may not correspond with the date of payment. Thus is may be necessary to delete the original payment and re-enter it using the date of service. Be aware this may cause reconciliation issues on your reporting. Alternatively, you might choose to enter a manual comment explaining the discrepancy and highlighting the actual date of service under the Invoice Comment field on the patient's Details screen prior to printing the invoice.
Frequently Asked Questions
DO I NEED TO ENTER STRIPE KEYS SEPARATELY FOR ONLINE BOOKING?
No. Once you have connected Stripe via Settings > Integrations > Stripe, those credentials are used automatically for online booking payments. You do not need to enter your publishable or secret keys separately.
DOES THIS WORK WITH THE HOSTED ONLINE BOOKING PAGE?
No. Online booking payments are only supported when using the embeddable Online Booking widget on your own website. The hosted page does not support payment collection.
WHAT HAPPENS IF A PATIENT DOES NOT COMPLETE PAYMENT DURING BOOKING?
The booking will not be confirmed if payment is required and the patient does not complete the payment step. The patient will need to restart the booking process.
WILL THE ICONPRACTICE 0.1% PROCESSING FEE APPLY TO ONLINE BOOKING PAYMENTS?
Yes. The same 0.1% iconpractice processing fee applies to all payments processed through the Stripe integration, including online booking payments, in addition to Stripe's standard transaction fees.