Overview
The Patient Account screen provides comprehensive financial information for individual patients, displaying invoices, payments, credits, and account balances. This interface allows practitioners and administrative staff to manage patient billing, process payments, and generate financial records.
Note: the printing and email of invoices has changed slightly since this video was made. See details below.
Accessing the Patient Account
- Search for and select a patient from the main search field
- Click on the Account option in the left navigation menu
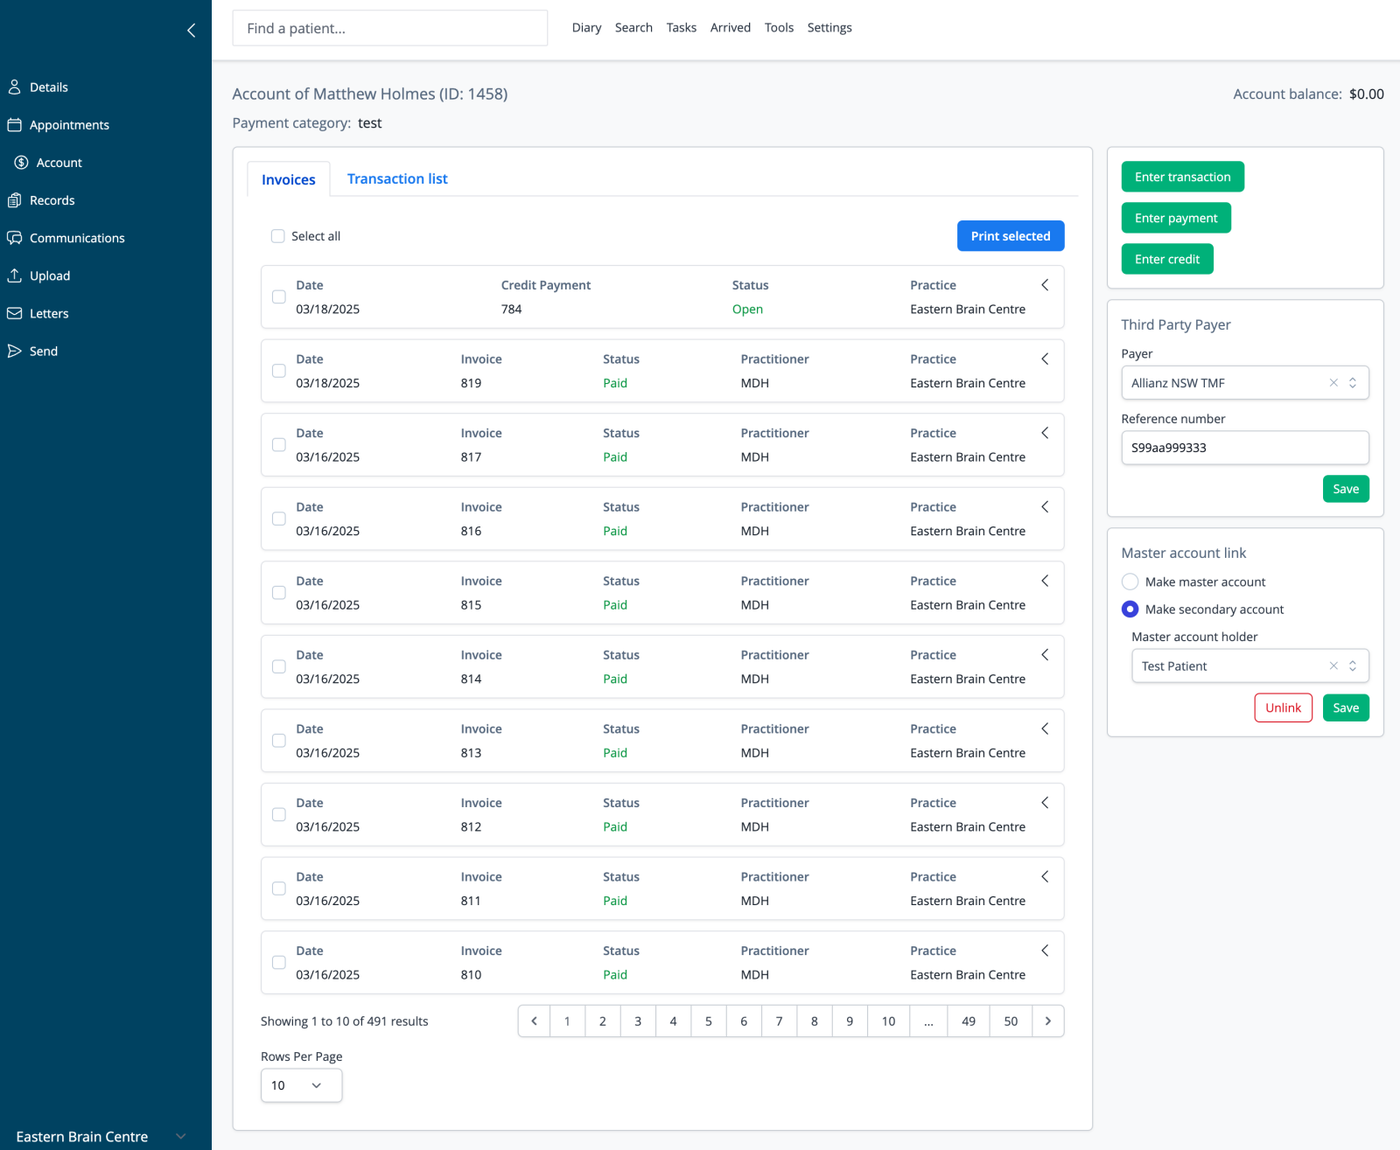
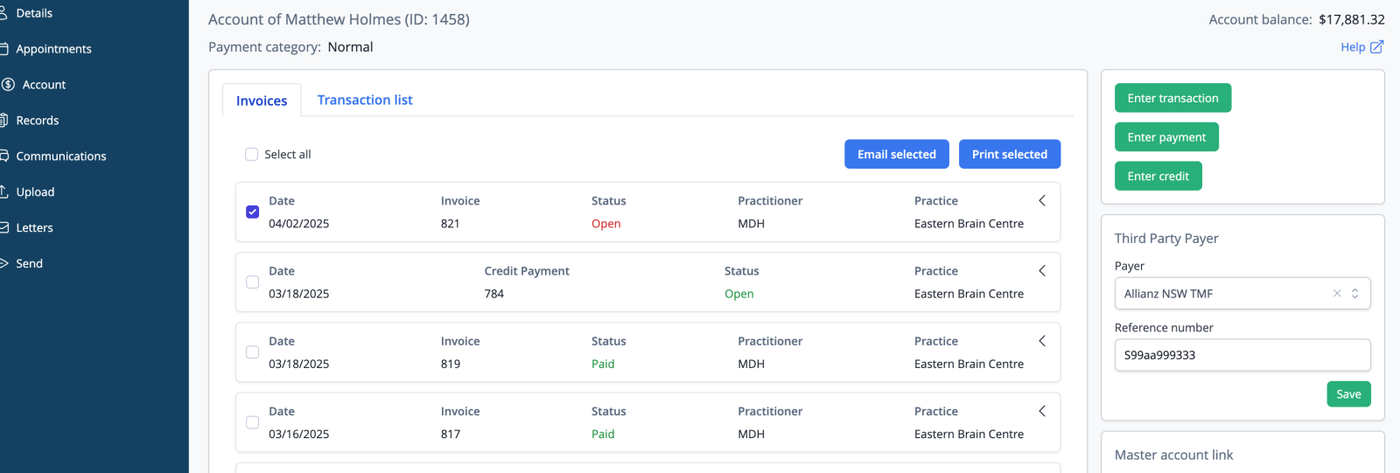
Account Header Information
The top section of the screen displays important account details:
- Patient Name and ID: Full name and unique identifier (e.g., "Account of Matthew Holmes (ID: 1458)")
- Account Balance: Current outstanding balance (e.g., "$0.00")
- Payment Category: Patient's assigned billing category (e.g., "Concession")
Financial Tabs
The main content area is organized with tabs:
- Invoices: List of all invoices and payments generated for the patient
- Transaction list: A credits and debits list of all financial transactions
Invoice and Transaction List
The list displays financial records:
- Checkbox: Select items for batch operations
- Date: Date the invoice or transaction was created
- Invoice/Credit Payment: Invoice number or payment reference
- Status: Current status (Open, Paid, Refund, Refunded)
- Practitioner: Provider associated with the transaction if any
- Practice: Location where service was provided
- Expand: Arrow to view additional details for each entry
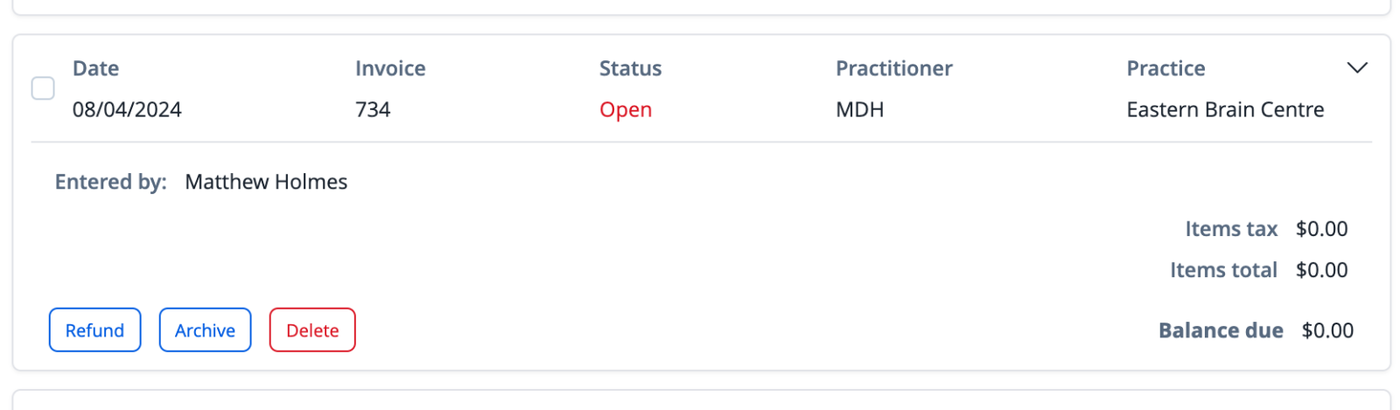
Managing invoices
Once expanded you can delete payments associated with an invoice, delete the invoice as a whole or refund an invoice.
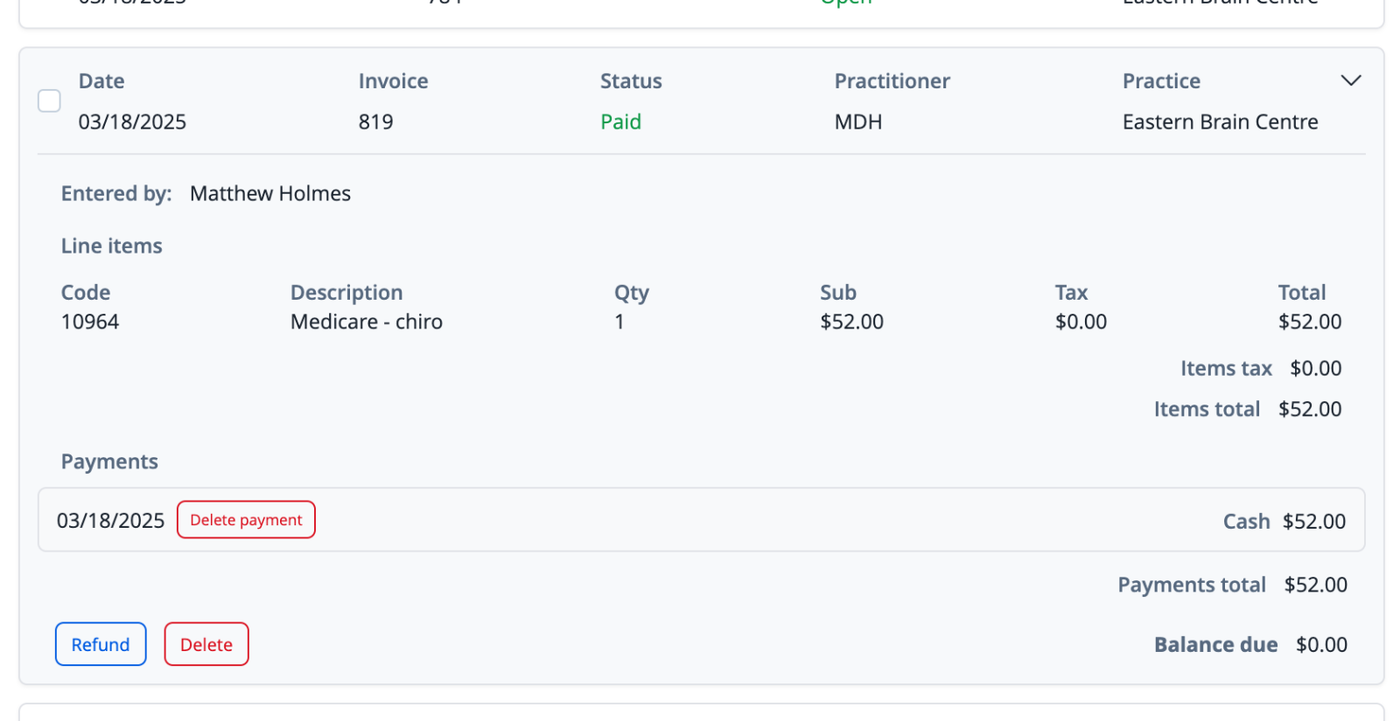
Deleting a payment will render the invoice as partially or fully unpaid, depending on the amount of the payment deleted. Deleting an invoice will remove it from the system. If an invoice being deleted has allocations from a credit payment, then those allocations will be returned to the credit payment.
Refunding invoices
After clicking the Refund button, you will presented with a lightbox modal like that shown below. Select the Line items you wish to refund, and then select the payment type and amount to refund.
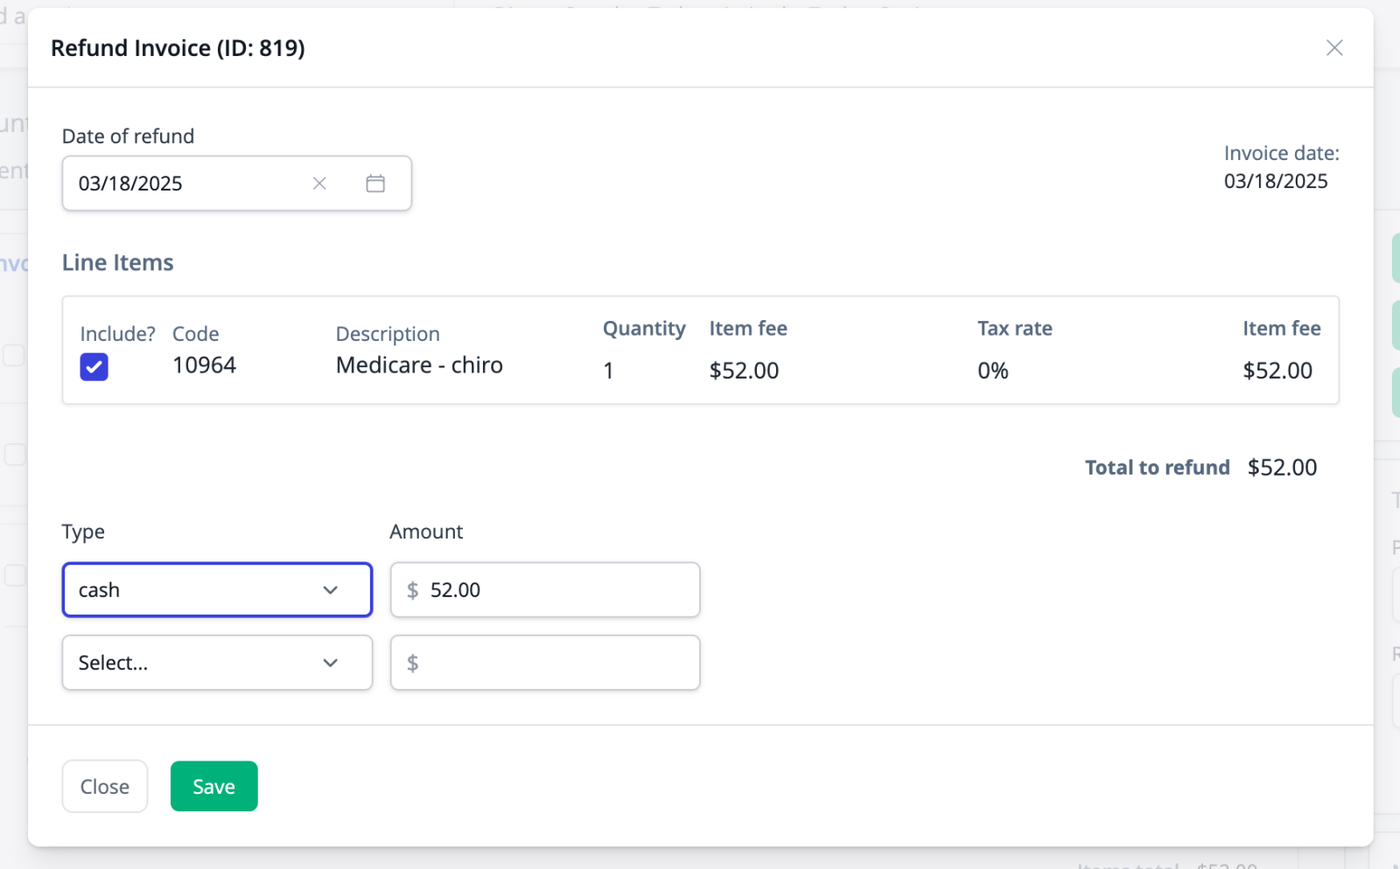
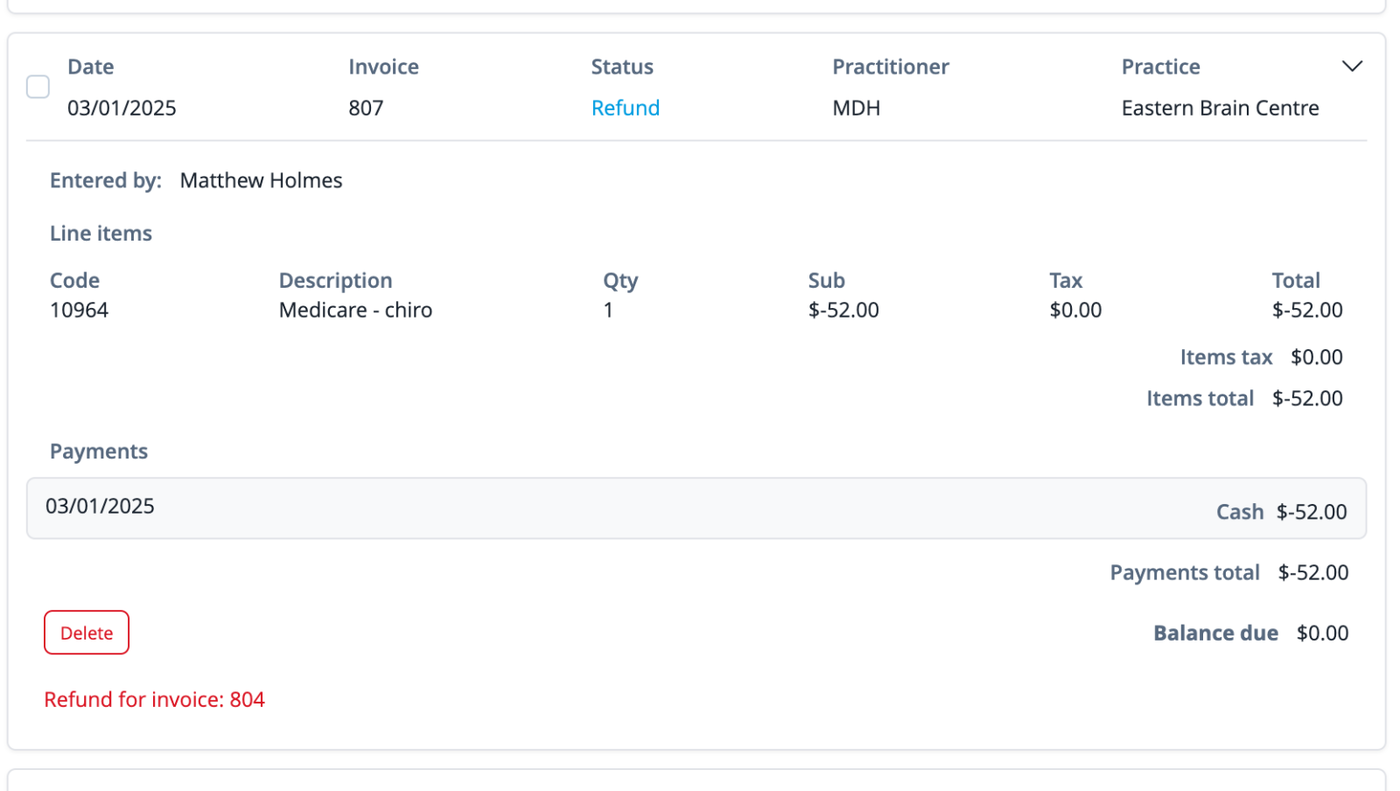
Once processed, the invoice in question will be marked as Refunded and the refund will be visible as an entry in the list of Invoices and Payments.
Archiving & Unarchiving Invoices
If an invoice has an outstanding balance (i.e. is "Open"), then it can be archived to remove it from the outstanding balances. This would typically be done to write off a bad debt. To archive an invoice click the Archive button.
Archived invoices can be unarchived by clicking the Unarchive button.
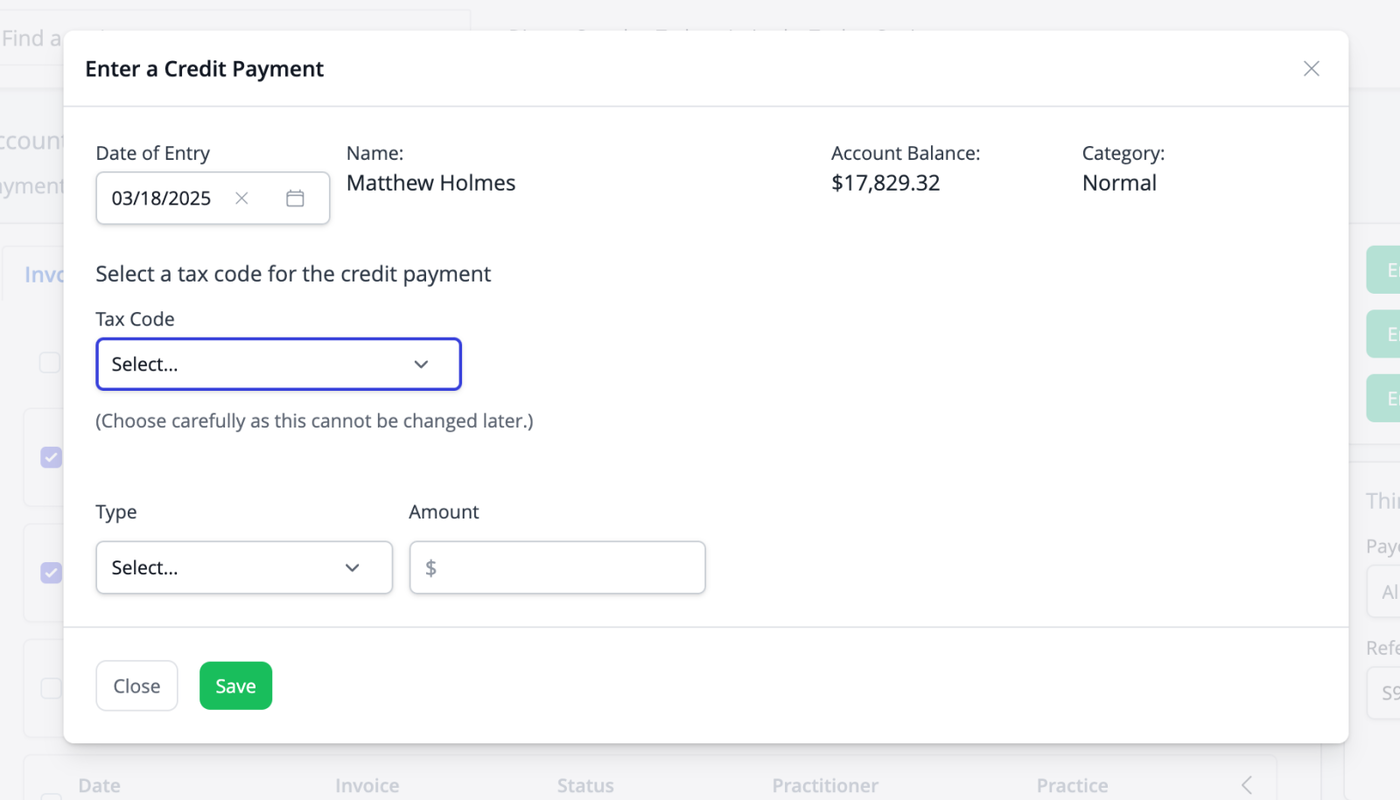
Managing Credit Payments
Credit payments can be allocated to (used for the payment of) invoices. Allocations can be deleted using the "Delete allocation" button visible in the image below. Deleting allocations will result in the associated invoice being marked as Open (unpaid).
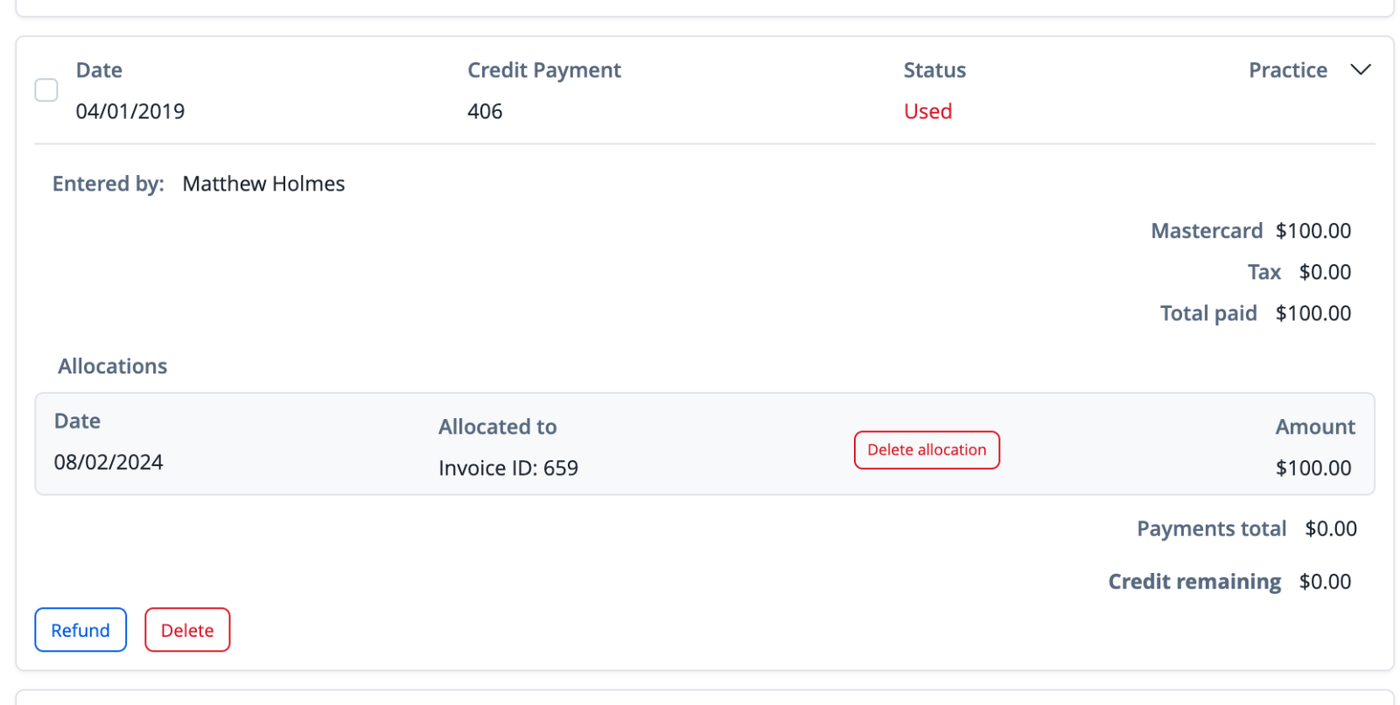
Once an credit payment has been fully used, it cannot be refunded without either deleting the associated invoice(s) or deleting the allocations to those invoices.
If a credit payment has been partially allocated to invoices and a refund is attempted, the system will offer to split the credit payment into a used and an unused section. Once this has been done, the newly created credit payment (that with the unused portion of the original credit) can be refunded.
Credit payments may also be deleted outright. Deleting a credit payment that has been fully or partially allocated to invoices will result in those invoices being marked as Open (unpaid).
List Features
- Select all: Checkbox to select all displayed records
- Print selected: Button to generate printouts of selected items
- Pagination: Navigate through multiple pages of records
- Rows Per Page: Control how many records display per page (default is 10)
Printing Invoices, Credit Payments or Transactions
To print invoices and credit payments, tick their respective checkboxes and then click the "Print Selected" button.
If the patient has a third party payer associated with their account, you can choose to print with the third party payer's details.
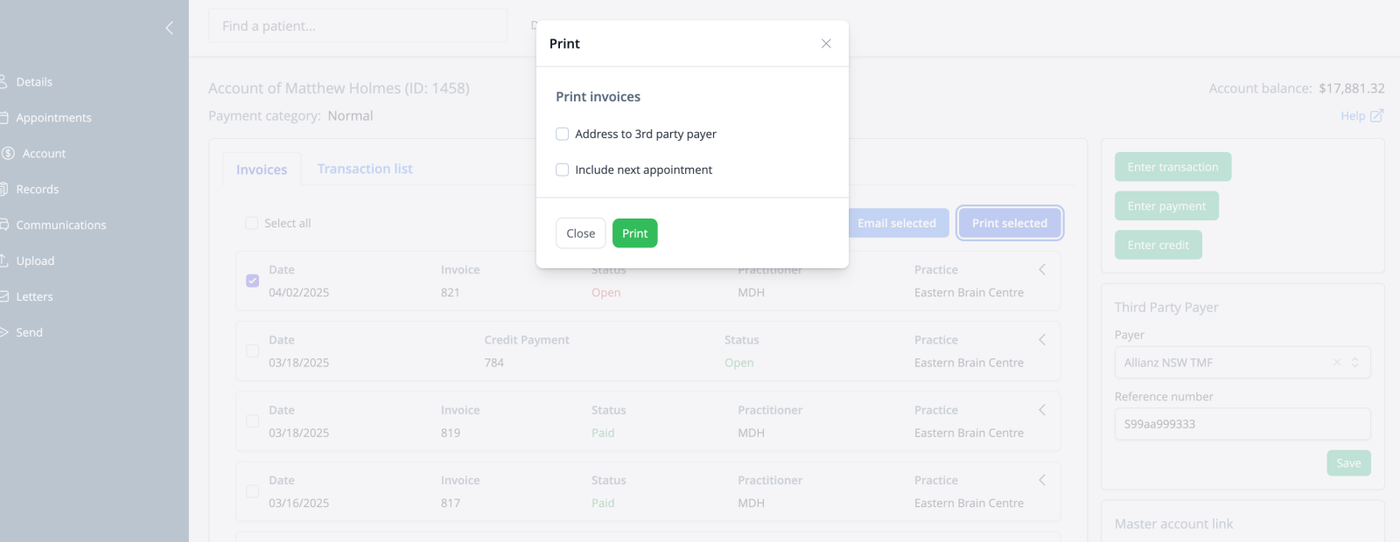
Click Print to open the document in a new tab.
To print a list of credits and/or debits from the Transactions tab, follow the same process.
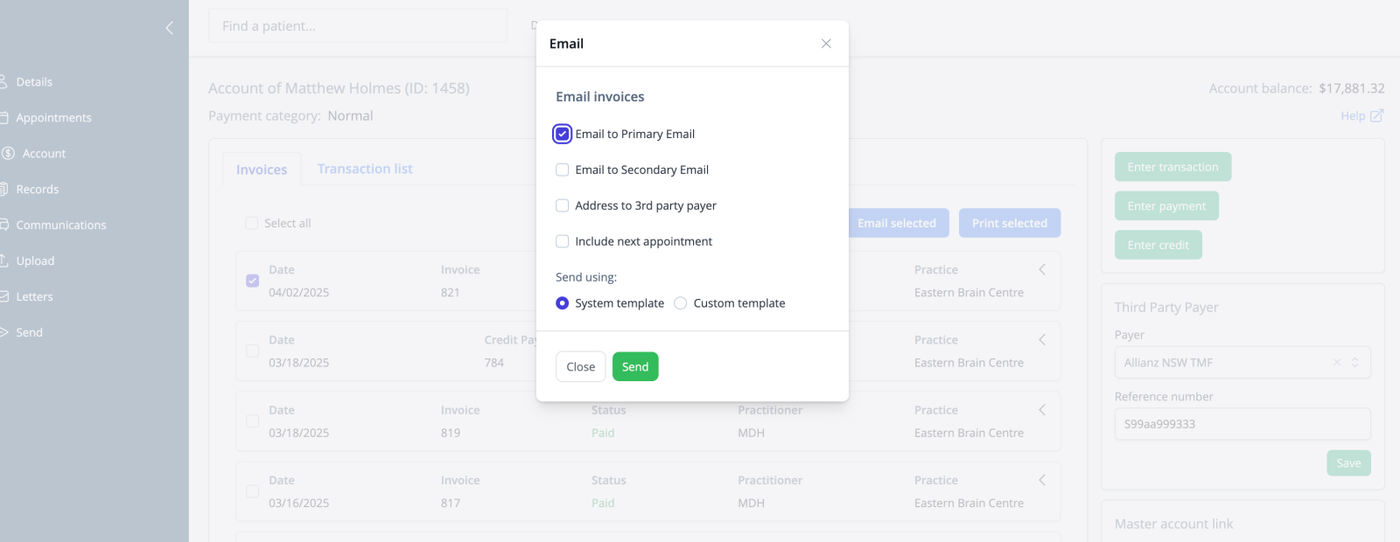
Emailing Invoices and/or Credit Payments
If the patient has a primary or secondary email address saved you can email the invoice to the primary email address, the secondary address or other customer email addresses. You can also send it to a third party payer associated with their account. To email invoices and credit payments, tick their respective checkboxes and then click the "Email Selected" button.
Choose to send to the primary and/or secondary email addresses, and whether to make the invoice out to a third party payer. Choose whether to send the email using the default system email template for financial documents (editable under Settings->System->System Email Templates) or using a custom email.
If sending the invoice to the patient, the default "System template" will usually suffice. Click Send and the email, with the invoice attached, will be queued for delivery. If you are emailing the invoice to a third party payer who requires custom information, then consider creating a custom email template (under Settings->Templates->Email Templates). You can then select that template to use. You can also manually add any additional email addresses to which you wish to send the email.
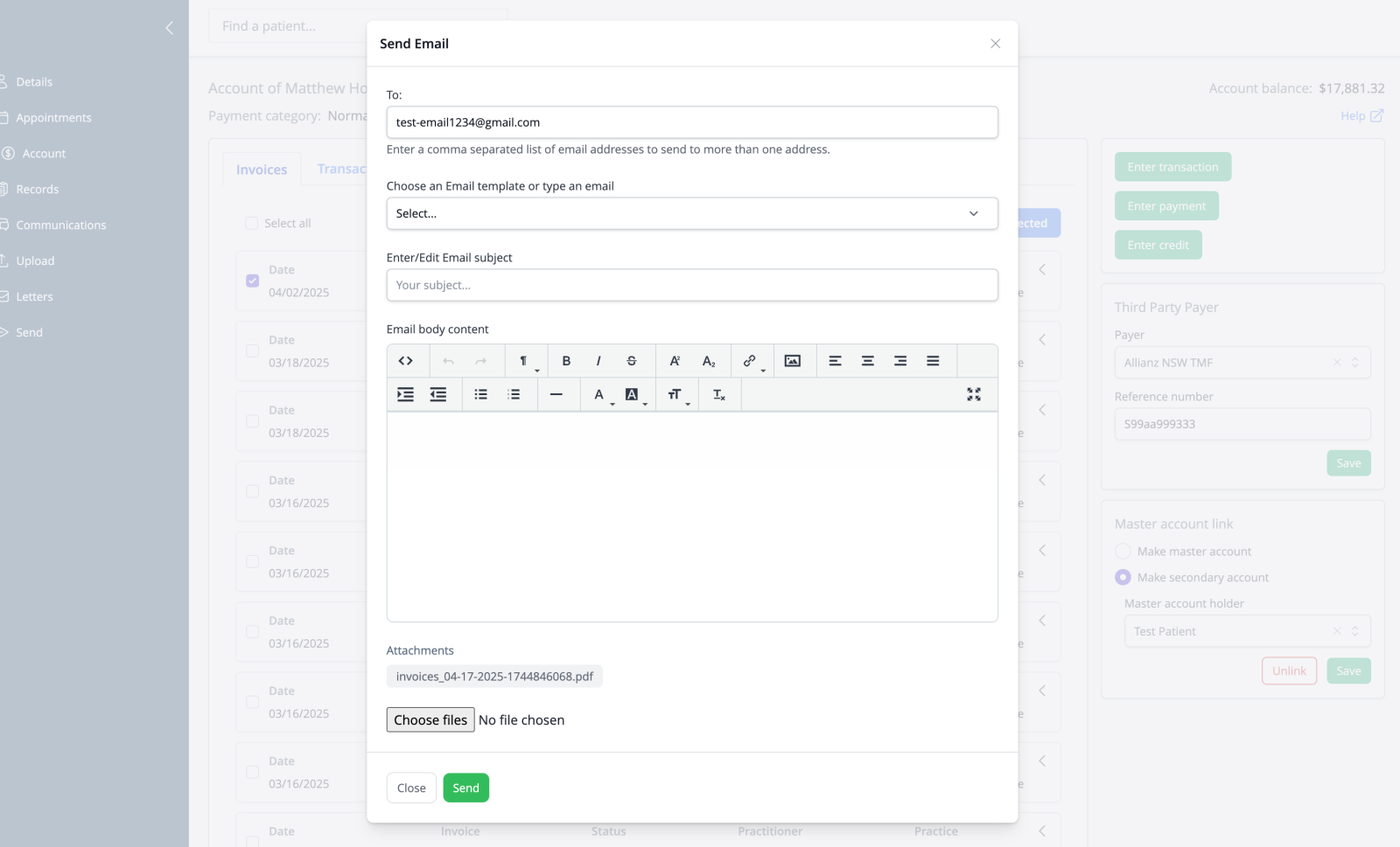
Click Send to send the email with the attached invoice.
Financial Actions
The right side of the screen provides buttons for common financial tasks:
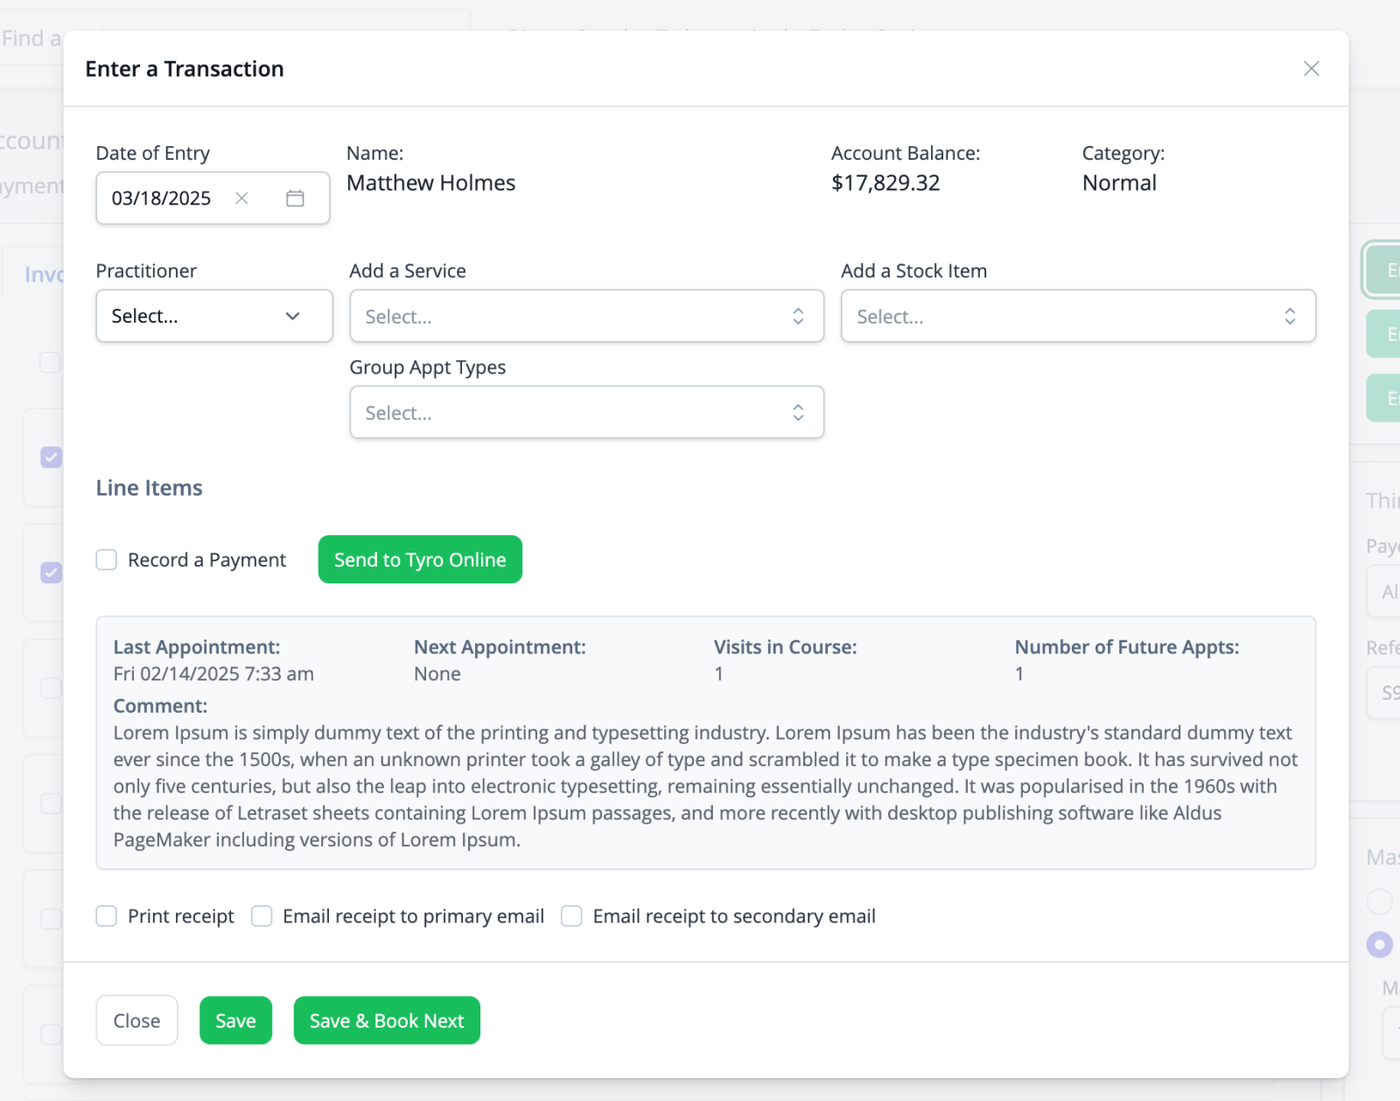
- Enter transaction: Record a general financial transaction
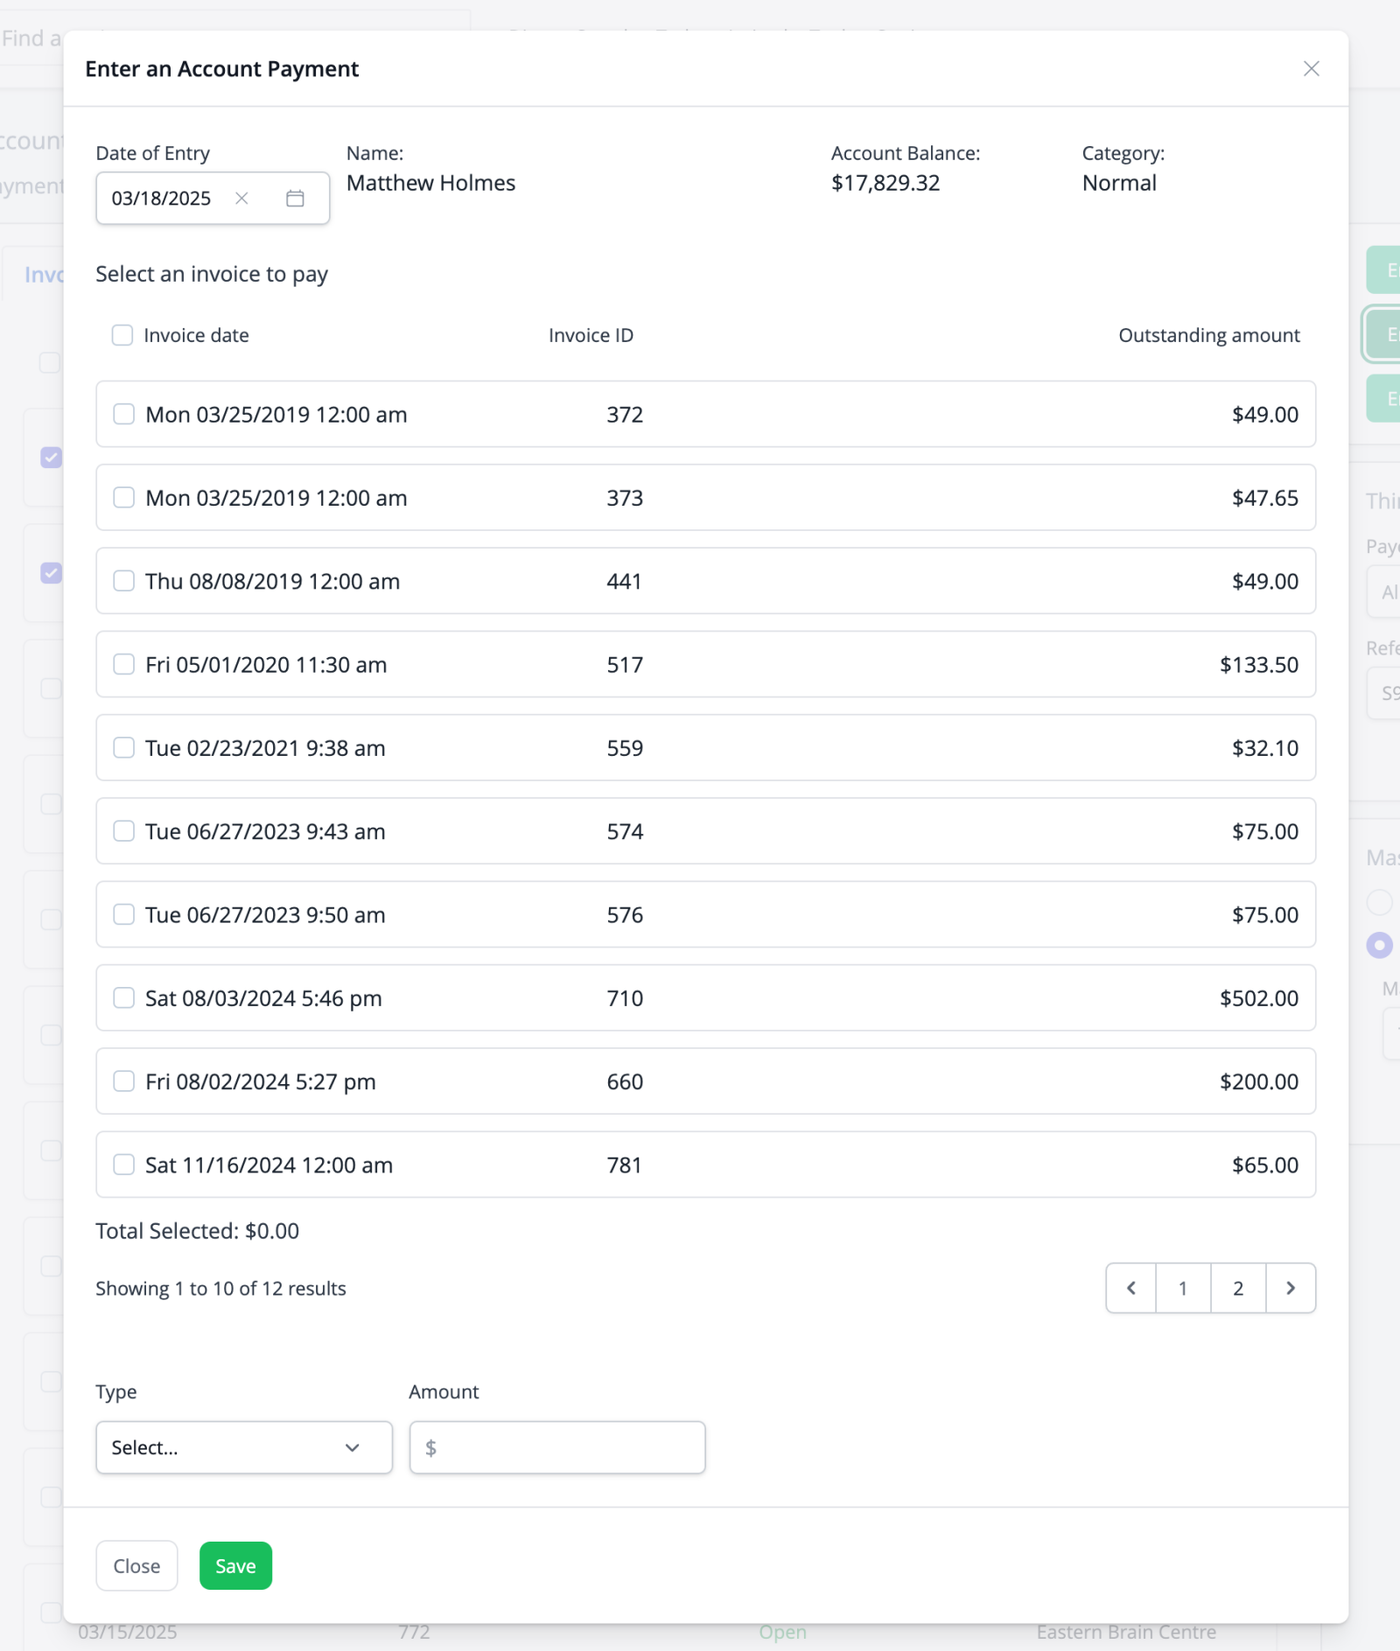
- Enter payment: Process and apply a patient payment
- Enter credit: Apply a credit to the patient's account
This process is the same as entering these from the Dairy screen as described in this video:
Third Party Payer Section
This section manages insurance or other external payment sources:
- Payer: Select a third-party payer from the dropdown list. Third-party payers can be managed in the Settings.
- Reference number: Enter a claim or reference number
- Save: Update the third-party payer information
Master Account Link
This section manages family accounts or linked patient records:
- Make master account: Set this patient as the primary account holder
- Make secondary account: Link this account to a master account
- Master account holder: Select the primary account holder
- Unlink: Remove connection to a master account
- Save: Update account linking settings
For more details on Master and Secondary Accounts, view this article.